
424 lines
16 KiB
Markdown
424 lines
16 KiB
Markdown
# Neo4j GraphRAG Package for Python
|
||
|
||
The official Neo4j GraphRAG package for Python enables developers to build [graph retrieval augmented generation (GraphRAG)](https://neo4j.com/blog/graphrag-manifesto/) applications using the power of Neo4j and Python.
|
||
As a first-party library, it offers a robust, feature-rich, and high-performance solution, with the added assurance of long-term support and maintenance directly from Neo4j.
|
||
|
||
## 📄 Documentation
|
||
|
||
Documentation can be found [here](https://neo4j.com/docs/neo4j-graphrag-python/)
|
||
|
||
### Resources
|
||
|
||
A series of blog posts demonstrating how to use this package:
|
||
|
||
- Build a Knowledge Graph and use GenAI to answer questions:
|
||
- [GraphRAG Python Package: Accelerating GenAI With Knowledge Graphs](https://neo4j.com/blog/graphrag-python-package/)
|
||
- Retrievers: when the Neo4j graph is already populated:
|
||
- [Getting Started With the Neo4j GraphRAG Python Package](https://neo4j.com/developer-blog/get-started-graphrag-python-package/)
|
||
- [Enriching Vector Search With Graph Traversal Using the GraphRAG Python Package](https://neo4j.com/developer-blog/graph-traversal-graphrag-python-package/)
|
||
- [Hybrid Retrieval for GraphRAG Applications Using the GraphRAG Python Package](https://neo4j.com/developer-blog/hybrid-retrieval-graphrag-python-package/)
|
||
- [Enhancing Hybrid Retrieval With Graph Traversal Using the GraphRAG Python Package](https://neo4j.com/developer-blog/enhancing-hybrid-retrieval-graphrag-python-package/)
|
||
- [Effortless RAG With Text2CypherRetriever](https://medium.com/neo4j/effortless-rag-with-text2cypherretriever-cb1a781ca53c)
|
||
|
||
A list of Neo4j GenAI-related features can also be found at [Neo4j GenAI Ecosystem](https://neo4j.com/labs/genai-ecosystem/).
|
||
|
||
|
||
## 🐍 Python Version Support
|
||
|
||
| Version | Supported? |
|
||
|---------|-----------:|
|
||
| 3.14 | ✓ |
|
||
| 3.13 | ✓ |
|
||
| 3.12 | ✓ |
|
||
| 3.11 | ✓ |
|
||
| 3.10 | ✓ |
|
||
|
||
## 📦 Installation
|
||
|
||
To install the latest stable version, run:
|
||
|
||
```shell
|
||
pip install neo4j-graphrag
|
||
```
|
||
|
||
### Optional Dependencies
|
||
|
||
This package has some optional features that can be enabled using
|
||
the extra dependencies described below:
|
||
|
||
- LLM providers (at least one is required for RAG and KG Builder Pipeline):
|
||
- **ollama**: LLMs from Ollama
|
||
- **openai**: LLMs from OpenAI (including AzureOpenAI)
|
||
- **google**: LLMs from Vertex AI
|
||
- **cohere**: LLMs from Cohere
|
||
- **anthropic**: LLMs from Anthropic
|
||
- **mistralai**: LLMs from MistralAI
|
||
- **bedrock**: LLMs from Amazon Bedrock
|
||
- **sentence-transformers** : to use embeddings from the `sentence-transformers` Python package
|
||
- Vector database (to use :ref:`External Retrievers`):
|
||
- **weaviate**: store vectors in Weaviate
|
||
- **pinecone**: store vectors in Pinecone
|
||
- **qdrant**: store vectors in Qdrant
|
||
- **experimental**: experimental features mainly related to the Knowledge Graph creation pipelines.
|
||
- **nlp**: installs spaCy for NLP pipelines, used by `SpaCySemanticMatchResolver` in the experimental KG builder components.
|
||
- **fuzzy-matching**: installs RapidFuzz, used by `FuzzyMatchResolver` in the experimental KG builder components.
|
||
|
||
> Note: The **`nlp`** extra is currently **not supported on Python 3.14** due to an upstream spaCy import-time issue ([spaCy #13895](https://github.com/explosion/spaCy/issues/13895)). Use Python **3.13 or earlier** for spaCy-based features until that is resolved upstream.
|
||
|
||
|
||
Install package with optional dependencies with (for instance):
|
||
|
||
```shell
|
||
pip install "neo4j-graphrag[openai]"
|
||
```
|
||
|
||
## 💻 Example Usage
|
||
|
||
The scripts below demonstrate how to get started with the package and make use of its key features.
|
||
To run these examples, ensure that you have a Neo4j instance up and running and update the `NEO4J_URI`, `NEO4J_USERNAME`, and `NEO4J_PASSWORD` variables in each script with the details of your Neo4j instance.
|
||
For the examples, make sure to export your OpenAI key as an environment variable named `OPENAI_API_KEY`.
|
||
Additional examples are available in the `examples` folder.
|
||
|
||
### Knowledge Graph Construction
|
||
|
||
**NOTE: The [APOC core library](https://neo4j.com/labs/apoc/) must be installed in your Neo4j instance in order to use this feature**
|
||
|
||
This package offers two methods for constructing a knowledge graph.
|
||
|
||
The `Pipeline` class provides extensive customization options, making it ideal for advanced use cases.
|
||
See the `examples/pipeline` folder for examples of how to use this class.
|
||
|
||
For a more streamlined approach, the `SimpleKGPipeline` class offers a simplified abstraction layer over the `Pipeline`, making it easier to build knowledge graphs.
|
||
Both classes support working directly with text and PDFs.
|
||
|
||
```python
|
||
import asyncio
|
||
|
||
from neo4j import GraphDatabase
|
||
from neo4j_graphrag.embeddings import OpenAIEmbeddings
|
||
from neo4j_graphrag.experimental.pipeline.kg_builder import SimpleKGPipeline
|
||
from neo4j_graphrag.llm import OpenAILLM
|
||
|
||
NEO4J_URI = "neo4j://localhost:7687"
|
||
NEO4J_USERNAME = "neo4j"
|
||
NEO4J_PASSWORD = "password"
|
||
|
||
# Connect to the Neo4j database
|
||
driver = GraphDatabase.driver(NEO4J_URI, auth=(NEO4J_USERNAME, NEO4J_PASSWORD))
|
||
|
||
# List the entities and relations the LLM should look for in the text
|
||
node_types = ["Person", "House", "Planet"]
|
||
relationship_types = ["PARENT_OF", "HEIR_OF", "RULES"]
|
||
patterns = [
|
||
("Person", "PARENT_OF", "Person"),
|
||
("Person", "HEIR_OF", "House"),
|
||
("House", "RULES", "Planet"),
|
||
]
|
||
|
||
# Create an Embedder object
|
||
embedder = OpenAIEmbeddings(model="text-embedding-3-large")
|
||
|
||
# Instantiate the LLM
|
||
llm = OpenAILLM(
|
||
model_name="gpt-5",
|
||
model_params={
|
||
"max_tokens": 2000,
|
||
"response_format": {"type": "json_object"},
|
||
"temperature": 0,
|
||
},
|
||
)
|
||
|
||
# Instantiate the SimpleKGPipeline
|
||
kg_builder = SimpleKGPipeline(
|
||
llm=llm,
|
||
driver=driver,
|
||
embedder=embedder,
|
||
schema={
|
||
"node_types": node_types,
|
||
"relationship_types": relationship_types,
|
||
"patterns": patterns,
|
||
},
|
||
on_error="IGNORE",
|
||
from_file=False,
|
||
)
|
||
|
||
# Run the pipeline on a piece of text
|
||
text = (
|
||
"The son of Duke Leto Atreides and the Lady Jessica, Paul is the heir of House "
|
||
"Atreides, an aristocratic family that rules the planet Caladan."
|
||
)
|
||
asyncio.run(kg_builder.run_async(text=text))
|
||
driver.close()
|
||
```
|
||
|
||
> Warning: In order to run this code, the `openai` Python package needs to be installed: `pip install "neo4j_graphrag[openai]"`
|
||
|
||
|
||
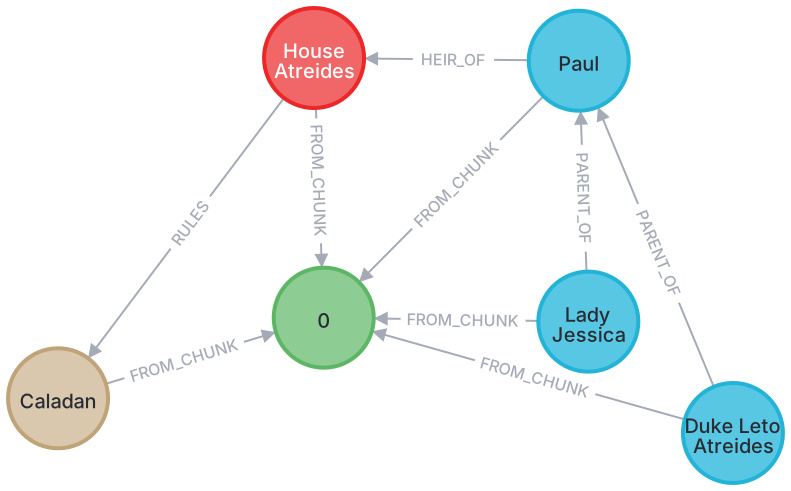
Example knowledge graph created using the above script:
|
||
|
||
|
||
|
||
### Creating a Vector Index
|
||
|
||
When creating a vector index, make sure you match the number of dimensions in the index with the number of dimensions your embeddings have.
|
||
|
||
```python
|
||
from neo4j import GraphDatabase
|
||
from neo4j_graphrag.indexes import create_vector_index
|
||
|
||
NEO4J_URI = "neo4j://localhost:7687"
|
||
NEO4J_USERNAME = "neo4j"
|
||
NEO4J_PASSWORD = "password"
|
||
INDEX_NAME = "vector-index-name"
|
||
|
||
# Connect to the Neo4j database
|
||
driver = GraphDatabase.driver(NEO4J_URI, auth=(NEO4J_USERNAME, NEO4J_PASSWORD))
|
||
|
||
# Create the index
|
||
create_vector_index(
|
||
driver,
|
||
INDEX_NAME,
|
||
label="Chunk",
|
||
embedding_property="embedding",
|
||
dimensions=3072,
|
||
similarity_fn="euclidean",
|
||
)
|
||
driver.close()
|
||
```
|
||
|
||
### Populating a Vector Index
|
||
|
||
This example demonstrates one method for upserting data in your Neo4j database.
|
||
It's important to note that there are alternative approaches, such as using the [Neo4j Python driver](https://github.com/neo4j/neo4j-python-driver).
|
||
|
||
Ensure that your vector index is created prior to executing this example.
|
||
|
||
```python
|
||
from neo4j import GraphDatabase
|
||
from neo4j_graphrag.embeddings import OpenAIEmbeddings
|
||
from neo4j_graphrag.indexes import upsert_vectors
|
||
from neo4j_graphrag.types import EntityType
|
||
|
||
NEO4J_URI = "neo4j://localhost:7687"
|
||
NEO4J_USERNAME = "neo4j"
|
||
NEO4J_PASSWORD = "password"
|
||
|
||
# Connect to the Neo4j database
|
||
driver = GraphDatabase.driver(NEO4J_URI, auth=(NEO4J_USERNAME, NEO4J_PASSWORD))
|
||
|
||
# Create an Embedder object
|
||
embedder = OpenAIEmbeddings(model="text-embedding-3-large")
|
||
|
||
# Generate an embedding for some text
|
||
text = (
|
||
"The son of Duke Leto Atreides and the Lady Jessica, Paul is the heir of House "
|
||
"Atreides, an aristocratic family that rules the planet Caladan."
|
||
)
|
||
vector = embedder.embed_query(text)
|
||
|
||
# Upsert the vector
|
||
upsert_vectors(
|
||
driver,
|
||
ids=["1234"],
|
||
embedding_property="vectorProperty",
|
||
embeddings=[vector],
|
||
entity_type=EntityType.NODE,
|
||
)
|
||
driver.close()
|
||
```
|
||
|
||
### Performing a Similarity Search
|
||
|
||
Please note that when querying a Neo4j vector index _approximate_ nearest neighbor search is used, which may not always deliver exact results.
|
||
For more information, refer to the Neo4j documentation on [limitations and issues of vector indexes](https://neo4j.com/docs/cypher-manual/current/indexes/semantic-indexes/vector-indexes/#limitations-and-issues).
|
||
|
||
In the example below, we perform a simple vector search using a retriever that conducts a similarity search over the `vector-index-name` vector index.
|
||
|
||
This library provides more retrievers beyond just the `VectorRetriever`.
|
||
See the `examples` folder for examples of how to use these retrievers.
|
||
|
||
Before running this example, make sure your vector index has been created and populated.
|
||
|
||
```python
|
||
from neo4j import GraphDatabase
|
||
from neo4j_graphrag.embeddings import OpenAIEmbeddings
|
||
from neo4j_graphrag.generation import GraphRAG
|
||
from neo4j_graphrag.llm import OpenAILLM
|
||
from neo4j_graphrag.retrievers import VectorRetriever
|
||
|
||
NEO4J_URI = "neo4j://localhost:7687"
|
||
NEO4J_USERNAME = "neo4j"
|
||
NEO4J_PASSWORD = "password"
|
||
INDEX_NAME = "vector-index-name"
|
||
|
||
# Connect to the Neo4j database
|
||
driver = GraphDatabase.driver(NEO4J_URI, auth=(NEO4J_USERNAME, NEO4J_PASSWORD))
|
||
|
||
# Create an Embedder object
|
||
embedder = OpenAIEmbeddings(model="text-embedding-3-large")
|
||
|
||
# Initialize the retriever
|
||
retriever = VectorRetriever(driver, INDEX_NAME, embedder)
|
||
|
||
# Instantiate the LLM
|
||
llm = OpenAILLM(model_name="gpt-5", model_params={"temperature": 0})
|
||
|
||
# Instantiate the RAG pipeline
|
||
rag = GraphRAG(retriever=retriever, llm=llm)
|
||
|
||
# Query the graph
|
||
query_text = "Who is Paul Atreides?"
|
||
response = rag.search(query_text=query_text, retriever_config={"top_k": 5})
|
||
print(response.answer)
|
||
driver.close()
|
||
```
|
||
|
||
## 🤝 Contributing
|
||
|
||
You must sign the [contributors license agreement](https://neo4j.com/developer/contributing-code/#sign-cla) in order to make contributions to this project.
|
||
|
||
### Install Dependencies
|
||
|
||
Our Python dependencies are managed using uv.
|
||
If uv is not yet installed on your system, you can follow the instructions [here](https://docs.astral.sh/uv/getting-started/installation/) to set it up.
|
||
To begin development on this project, start by cloning the repository and then install all necessary dependencies, including the development dependencies, with the following command:
|
||
|
||
```bash
|
||
uv sync --group dev
|
||
```
|
||
|
||
### Reporting Issues
|
||
|
||
If you have a bug to report or feature to request, first
|
||
[search to see if an issue already exists](https://docs.github.com/en/github/searching-for-information-on-github/searching-on-github/searching-issues-and-pull-requests#search-by-the-title-body-or-comments).
|
||
If a related issue doesn't exist, please raise a new issue using the [issue form](https://github.com/neo4j/neo4j-graphrag-python/issues/new/choose).
|
||
|
||
If you're a Neo4j Enterprise customer, you can also reach out to [Customer Support](http://support.neo4j.com/).
|
||
|
||
If you don't have a bug to report or feature request, but you need a hand with
|
||
the library; community support is available via [Neo4j Online Community](https://community.neo4j.com/)
|
||
and/or [Discord](https://discord.gg/neo4j).
|
||
|
||
### Workflow for Contributions
|
||
|
||
1. Fork the repository.
|
||
2. Install Python and uv.
|
||
3. Create a working branch from `main` and start with your changes!
|
||
|
||
### Code Formatting and Linting
|
||
|
||
Our codebase follows strict formatting and linting standards using [Ruff](https://docs.astral.sh/ruff/) for code quality checks and [Mypy](https://github.com/python/mypy) for type checking.
|
||
Before contributing, ensure that all code is properly formatted, free of linting issues, and includes accurate type annotations.
|
||
|
||
- To install Ruff, follow the instructions [here](https://docs.astral.sh/ruff/installation/).
|
||
- To set up Mypy, follow the steps outlined [here](https://mypy.readthedocs.io/en/stable/getting_started.html#installing-and-running-mypy).
|
||
|
||
Adherence to these standards is required for contributions to be accepted.
|
||
|
||
#### Using Pre-commit
|
||
|
||
We recommend setting up [pre-commit](https://pre-commit.com/) to automate code quality checks.
|
||
This ensures your changes meet our guidelines before committing.
|
||
|
||
1. Install pre-commit by following the [installation guide](https://pre-commit.com/#install).
|
||
2. Set up the pre-commit hooks by running:
|
||
|
||
```bash
|
||
pre-commit install
|
||
```
|
||
|
||
3. To manually check if a file meets the quality requirements, run:
|
||
|
||
```bash
|
||
pre-commit run --file path/to/file
|
||
```
|
||
|
||
### Pull Requests
|
||
|
||
When you're finished with your changes, create a pull request (PR) using the following workflow.
|
||
|
||
- Ensure you have formatted and linted your code.
|
||
- Ensure that you have [signed the CLA](https://neo4j.com/developer/contributing-code/#sign-cla).
|
||
- Ensure that the base of your PR is set to `main`.
|
||
- Don't forget to [link your PR to an issue](https://docs.github.com/en/issues/tracking-your-work-with-issues/linking-a-pull-request-to-an-issue)
|
||
if you are solving one.
|
||
- Check the checkbox to [allow maintainer edits](https://docs.github.com/en/pull-requests/collaborating-with-pull-requests/working-with-forks/allowing-changes-to-a-pull-request-branch-created-from-a-fork)
|
||
so that maintainers can make any necessary tweaks and update your branch for merge.
|
||
- Reviewers may ask for changes to be made before a PR can be merged, either using
|
||
[suggested changes](https://docs.github.com/en/pull-requests/collaborating-with-pull-requests/reviewing-changes-in-pull-requests/incorporating-feedback-in-your-pull-request)
|
||
or normal pull request comments. You can apply suggested changes directly through
|
||
the UI. Any other changes can be made in your fork and committed to the PR branch.
|
||
- As you update your PR and apply changes, mark each conversation as [resolved](https://docs.github.com/en/github/collaborating-with-issues-and-pull-requests/commenting-on-a-pull-request#resolving-conversations).
|
||
- Update the `CHANGELOG.md` if you have made significant changes to the project, these include:
|
||
- Major changes:
|
||
- New features
|
||
- Bug fixes with high impact
|
||
- Breaking changes
|
||
- Minor changes:
|
||
- Documentation improvements
|
||
- Code refactoring without functional impact
|
||
- Minor bug fixes
|
||
- Keep `CHANGELOG.md` changes brief and focus on the most important changes.
|
||
|
||
### Updating the `CHANGELOG.md`
|
||
|
||
1. You can automatically generate a changelog suggestion for your PR by commenting on it [using CodiumAI](https://github.com/CodiumAI-Agent):
|
||
|
||
```
|
||
@CodiumAI-Agent /update_changelog
|
||
```
|
||
|
||
2. Edit the suggestion if necessary and update the appropriate subsection in the `CHANGELOG.md` file under 'Next'.
|
||
3. Commit the changes.
|
||
|
||
## 🧪 Tests
|
||
|
||
To be able to run all tests, all extra packages needs to be installed.
|
||
This is achieved by:
|
||
|
||
```bash
|
||
uv sync --all-extras
|
||
```
|
||
|
||
### Unit Tests
|
||
|
||
Install the project dependencies then run the following command to run the unit tests locally:
|
||
|
||
```bash
|
||
uv run pytest tests/unit
|
||
```
|
||
|
||
### E2E tests
|
||
|
||
To execute end-to-end (e2e) tests, you need the following services to be running locally:
|
||
|
||
- neo4j
|
||
- weaviate
|
||
- weaviate-text2vec-transformers
|
||
|
||
The simplest way to set these up is by using Docker Compose:
|
||
|
||
```bash
|
||
docker compose -f tests/e2e/docker-compose.yml up
|
||
```
|
||
|
||
_(tip: If you encounter any caching issues within the databases, you can completely remove them by running `docker compose -f tests/e2e/docker-compose.yml down`)_
|
||
|
||
For SEARCH-clause e2e tests (`tests/e2e/test_search_clause_e2e.py`), use the Neo4j 2026 compose file instead. It pins Neo4j 2026.02.2 (required for the Cypher 25 `SEARCH` clause) and binds the same `7687`/`7474` ports — stop the default stack first:
|
||
|
||
```bash
|
||
docker compose -f tests/e2e/docker-compose.yml down
|
||
docker compose -f tests/e2e/docker-compose.neo4j2026.yml up -d
|
||
```
|
||
|
||
Once all the services are running, execute the following command to run the e2e tests:
|
||
|
||
```bash
|
||
uv run pytest tests/e2e
|
||
```
|
||
|
||
## ℹ️ Additional Information
|
||
|
||
- [The official Neo4j Python driver](https://github.com/neo4j/neo4j-python-driver)
|
||
- [Neo4j GenAI integrations](https://neo4j.com/docs/cypher-manual/current/genai-integrations/)
|